Super easy, quick, overnight no-knead focaccia bread recipe
Cue the Bob Ross and make floral paintings on your garden focaccia bread!
Learn how to make Focaccia bread art that is edible with this simple quick Focaccia recipe and there is no need to knead this easy bread!
Delicious and super easy no-knead focaccia bread recipe plus how to make focaccia bread art! This overnight Focaccia is one of the easiest breads to make, there is little hands-on work and it pretty much makes itself if you just give it the time to rise overnight and do a second rise the next day… and the rise timing is unfussy and the bread is forgiving for the novice baker. And it bakes in half an hour for a simple dinner side for Italian night or summer grilled dinners. This is a dairy-free and vegan focaccia bread is made without butter but it’s still got that amazing buttery and olive oil taste thanks to a combo of Nutiva’s natural butter flavoured coconut oil (natural flavour from fermented herbs gives it the scent and taste of butter and buttery popcorn) as a healthy butter alternative and olive oil for authentic focaccia flavour and these healthy fats help make this bread so tender almost like the cake of bread, yet butterless and of course a lactose-free and vegan bread.
This no-knead bread is kid-friendly as the kids can help create the Focaccia garden by decorating with colourful flower shapes and other focaccia toppings on the bread (once you have done the cutting part) and in making the dough. You can even get them to draw a flower or seaweed design for you to cut out the shapes accordingly to create the edible art ideas they like. And this is a delicious, healthy homemade alternative to garlic bread for the kids. Top with cheese if tolerated to make it an ultra kid-approved recipe of focaccia breadsticks similiar to pizza breadsticks, but healthier.
Or if you want a super quick, minimally hands on recipe skip the art and make classic focaccia that is ridiculously easy to make and a foolproof bread.
This is a great quarantine bread as it uses simple pantry ingredients and is easy to follow and make even as a novice bread maker. And you can make it an Artisan bread.
Focaccia is such a delicious bread that is fluffly on the inside and crispy on the outside. It has a rich food flavor due to olive oil, herbs and garlic so it has a distinct flavour that makes it delicious as a starter alone or as a dinner side for summer grilling.
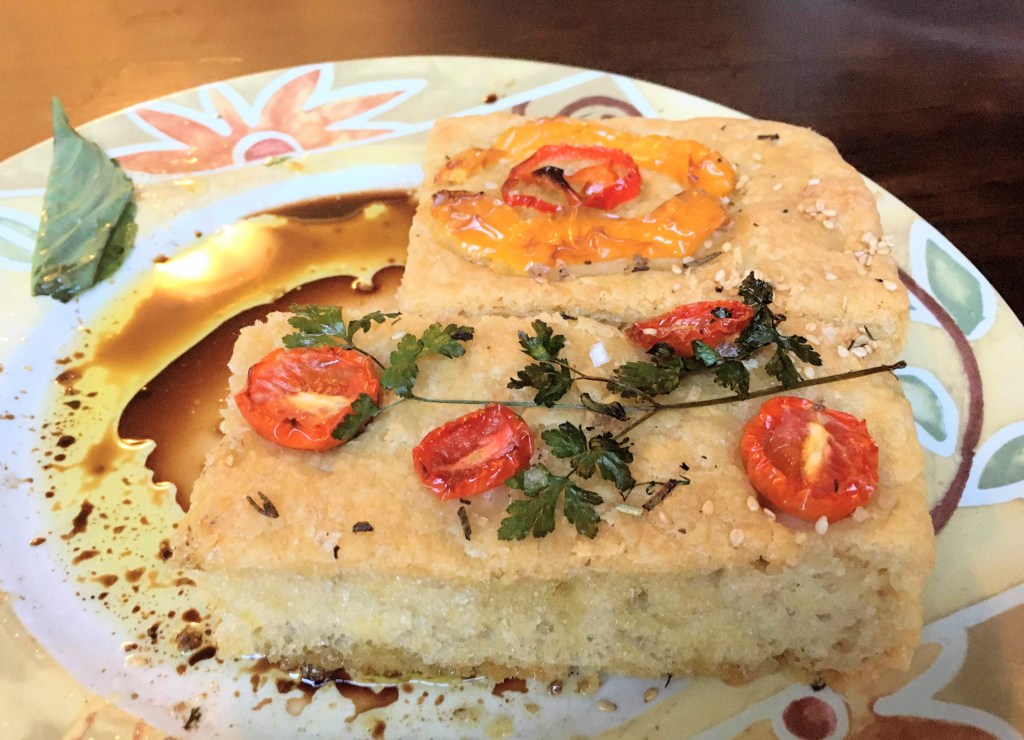
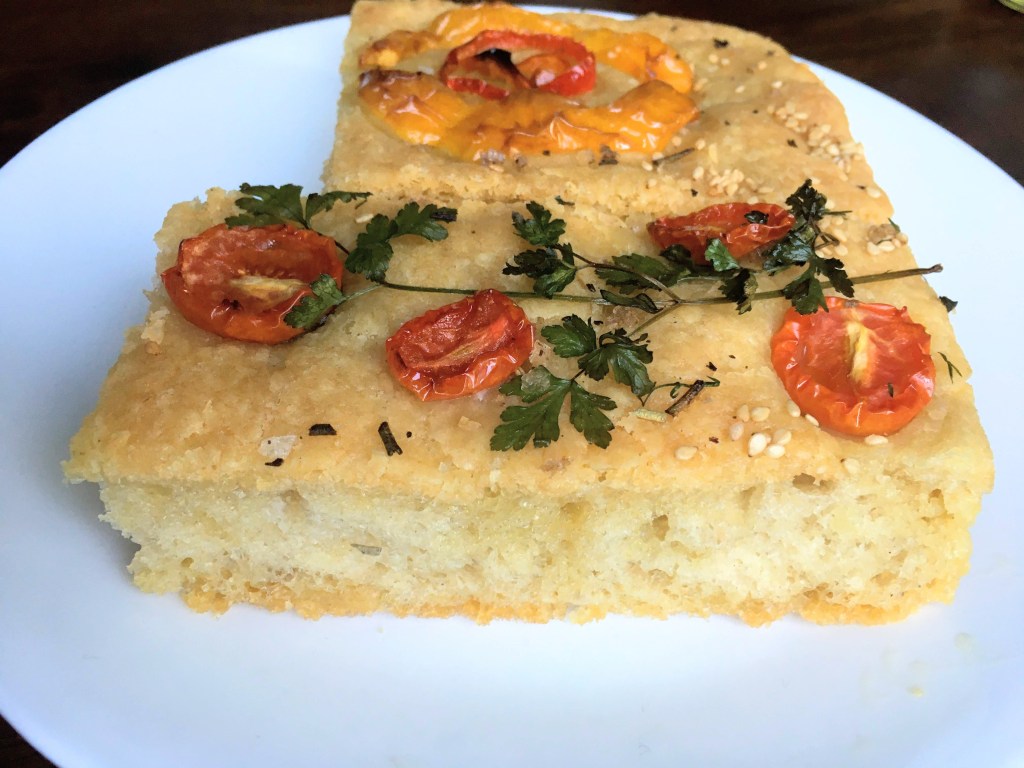
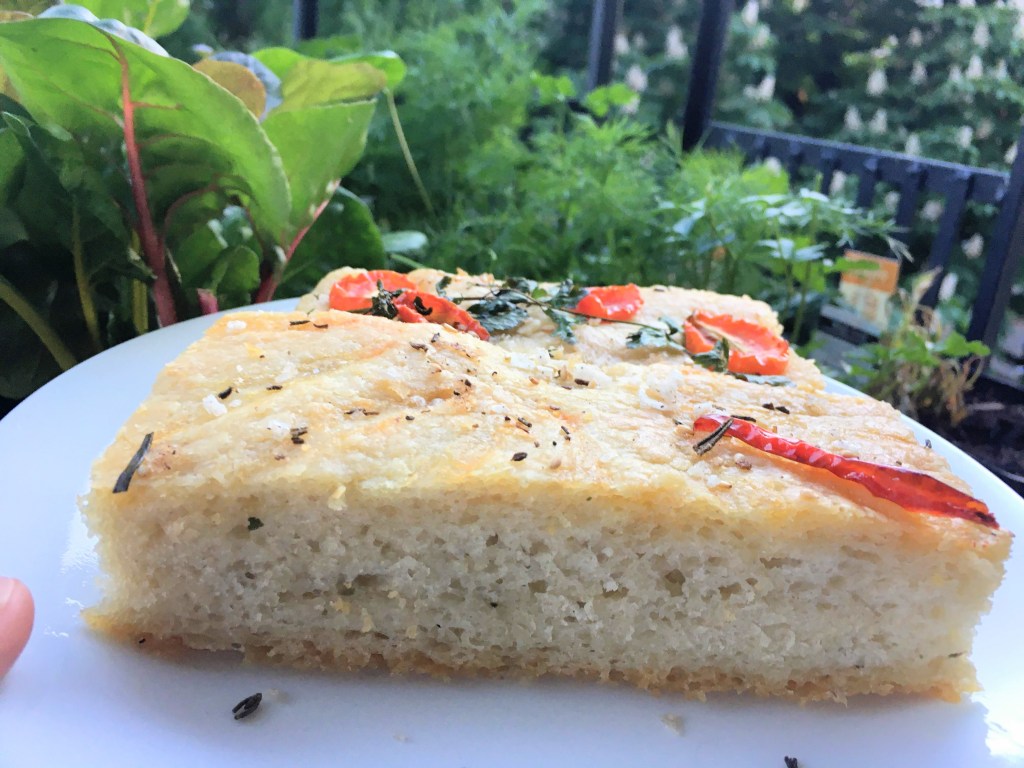
A ridiculously easy bread recipe, this focaccia bread recipe has extra flavour from roasted veggies such as roasted tomatoes, and I needn’t tell you an herb focaccia fresh out of the oven is going to be your favourite focaccia bread ever!
The smell in the oven from the herbs, roasted garlic and roasted veggies is heavenly! this focaccia bread has the distinct flavour and texture of an herb foacaccia but the added flavour and nutrition of roasted veggies and fresh herbs and garlic. It’s almost like a ready focaccia bread panini.
Meal planning tip to avoid rushing the rise:
Make this bread in the evening so the first rise happens overnight, then do the second rise in the morning or afternoon for 1.5-4 hrs and bake fresh focaccia bread in time for dinner!
Equipment to have out and ready:
Ideally 2 large bowls for mixing then proofing
Danish dough whisk or a wooden spoon and rubber spatula
measuring cups and measuring spoons (US link measuring cups, measuring spoons
garlic press, to crush garlic with
Small Fry pan, if you plan on making diy garlic infused olive oil or have a bottle of ready garlic olive oil
13 x 9 ” cake pan, ( a newer nonstick pan will release all breads and baked goods easier, older pans may need even more greasing and prying)
To make focaccia art flowers and leaves:
a sharp knife (dull knives are dangerous since they require more force and tugging, if needed sharpen your knife, especially if making tomato roses from large tomatoes by peeling the skin with a knife away form the tomato flesh in order to spiralize it and create roses from the tomato peel. or keep the shapes basic. I used this small serrated stainless steel pairing knife for simple shapes.
kitchen scissors, for cutting and trimming the fresh thyme and rosemary
Note: this easy Focaccia recipe can be halved however then you will not have enough surface area for art work and you will need to use a small glass lasagna pan or a round cake pan. But even when you don’t have time for food art you can still make a delicious rosemary and garlic focaccia bread to be enjoyed on its own and topped with extra herbs and sea salt flakes for flavour and beauty.
Ingredients:
2 1/4 tsp Instant yeast, active dry yeast (or fresh yeast plus extra tsp. honey)
2.5 cups lukewarm water
Tbsp honey, squeeze honey or raw honey is fine (this helps the yeast, don’t skip, sugar can be subbed)
5 1/4 cups white all purpose flour (it is possible to sub one cup of whole wheat flour in to make it healthy, but ideally focaccia is a light fluffy bread made white flour)
2/3-1 tbsp ground sea salt (note too much salt can hinder yeast so don’t add more nor prematurely)
fresh herbs (see balcony garden section for simple tips to grow windowsill herbs or balcony herbs and greens in a tiny apartment.
6 tbsp Basil infused olive oil or Rosemary infused olive oil or Garlic infused olive oil or extra virgin olive oil+ garlic cloves, 2 tbsp for inside the dough and 4 tbsp for the bottom of large proofing bowl
optional: sliced fresh chives to add to the homemade garlic infused oil
tbsp fresh rosemary leaves and/or thyme leaves, stripped, or tsp dried rosemary and/or thyme or dried chives (Im sure a bit or dried oregano or fresh minced basil or dried basil would be great too)
2-5 cloves garlic, crushed
4 tbsp natural butter flavoured coconut oil, melted or olive oil for greasing the pan
olive oil, for drizzling ontop before baking
Flakey sea salt such as Maldon salt flakes, a finish salt for those larger bites of salt flakes bursting iwth flavour and texture
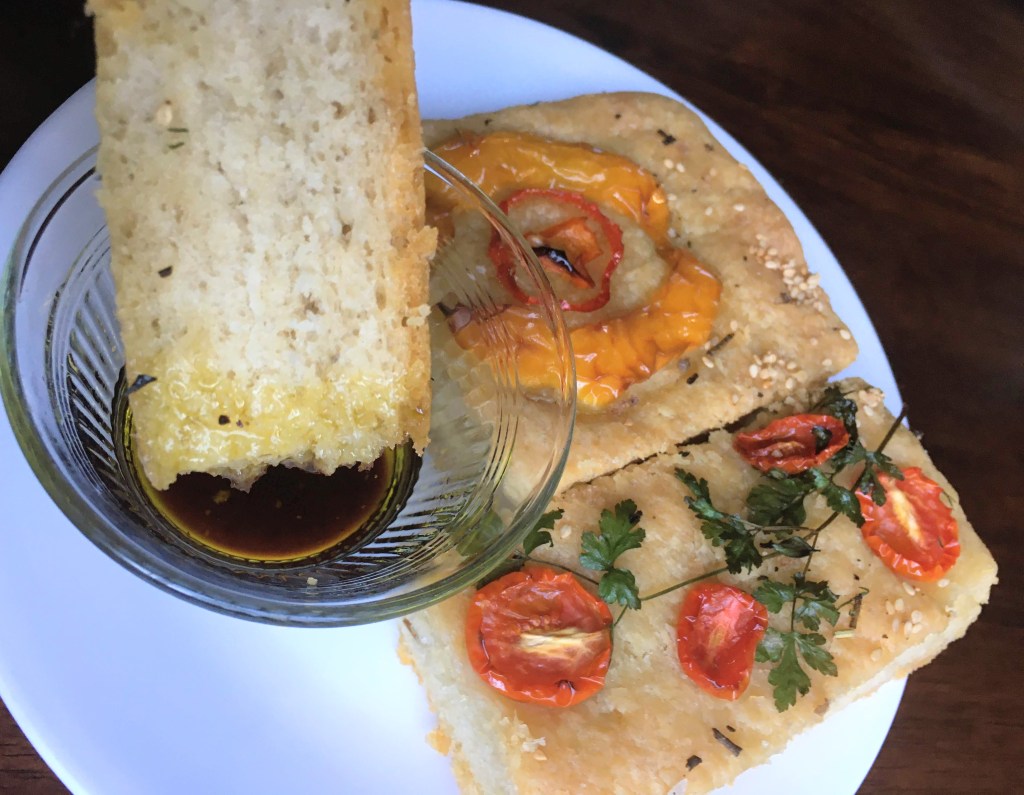
for serving: balsamic vinegar and extra virgin olive oil
Recipe Directions:
in a medium bowl (unless you have two large bowls ideally) whisk the yeast, honey and lukewarm water together, and let sit 5 minutes.do not add salt yet. The yeast will foam and get a bit creamy like a pale milky coffee. if not- the yeast is dead, check the expiry date and start over with new yeast.
meantime make the garlic infused olive oil if using. to infuse the olive oil heat a fry pan over low medium heat, you don’t want to burn or fully cook the garlic as it will be baked later. warm 4 tbsp of olive oil, add garlic and fresh herbs, saute garlic and chives or other fresh sliced herbs if using, for just 2-3 minutes, stirring often to not burn. you will only scoop out 2 tbsp. of this oil to put in the dough.
once the yeast is ready mix in the the flour, ground salt and 2 tbsp (infused) olive oil. Mix with a Danish dough hook/ whisk or wooden spoon, it will look shaggy at first but as you mix it will smooth out a bit so there are no dry spots, but it may still be a tiny bit bumpy, don’t worry it will look nicer later. (Alternatively the mixing can be done in a stand mixer fitted with a dough hook attachment on low speed, scraping down the sides and hook as needed to incorporate dry flour.)
pour about 4 tbsp of olive oil (using remaining 2 tbsp from the fry pan) into a large bowl then transfer the dough into the large bowl. Measure it to not skimp on oil! Flip to coat in oil. cover the bowl with seran wrap and leave to rise for 8-24 hours in the fridge or 3-4 hours at room temperature. It will fill up the entire large bowl once it rises!
Take out and uncover.

imagine there are four points on the outside circumfrence of your dough. use two forks to fold in two points/corners into the middle, then use the forks to fold in the other two corners into the middle. you are simply folding the dough in on itself to make a ball with the folds on top. Repeat. this will deflate your dough, but it will be left to rise a second time.
Grease the nonstcick cake pan very generously with melted buttery coconut oil or olive oil, brushing the oil up the sides and giving an extra drizzle in the middle. Transfer the dough using two forks at the edges into the cake pan for the second rise. Flip it to coat in oil.
let it rise uncovered on top of a preheating oven or in a warm place like by the radiator. The oven should not be so hot that you can’t touch it as that would kill the yeast but 300-325 degrees or so is fine. Let it rise 2-4 hours (if you did the first rise for a whole day then it may only take 1.5 hrs, different factors like how warm the room is, affect the yeast so there isn’t an exact time rule, just not over 4hrs and most of all, until dough is at least doubled in size, so that you don’t need to stretch the dough much to fill a large cake pan, you will later push it out with your fingers almost like pressing out playdough).
Meanwhile the bread is in the last hour or two of its second rise, you can snip the homegrown herbs and cut the flower shapes out of veggies, and keep them ready on the cutting board.
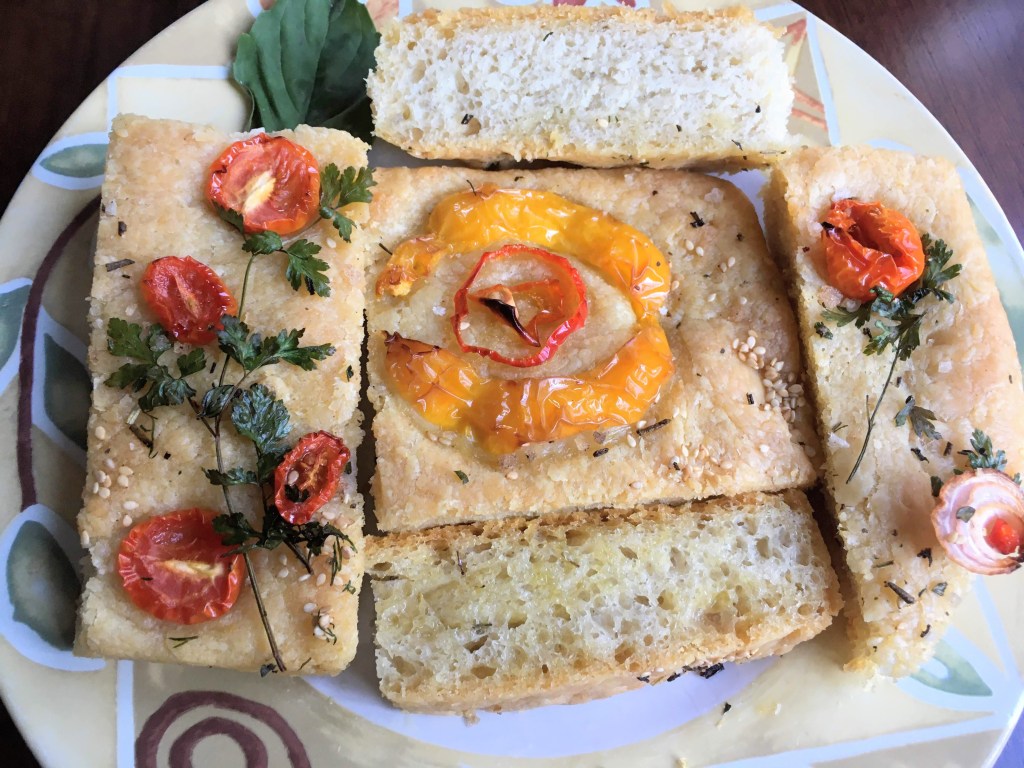
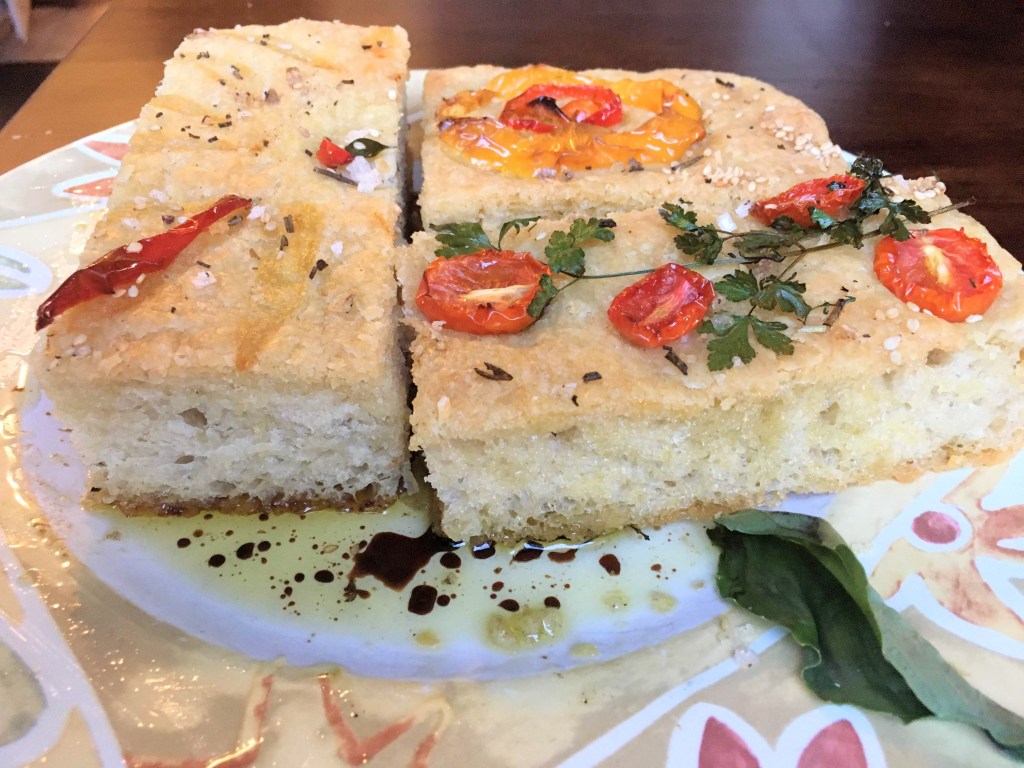
(tips on how to make focaccia artwork toppings for Botanical focaccia: adding fresh herbs and their stems and vegetable shapes to create mini tomato roses and other flowers and leaves. I find that using too thick and large of a bell pepper keeps the bread from goldening and baking evenly, but too thin can burn. the day before I tried making a bell pepper tulip from a large fat chunk of bell pepper and that didn’t work out so nice. the next day I overcompensated and my large sunflower flower petals burned since I made them not only thin but I scraped the underside of their pithe off so they would not have too much depth. That made them too thin and they got charred. Aim for balance, and if in doubt use lots of halved and quartered mini tomato roses as mini tomatoes and parsley do perfectly well in the oven on this focaccia bread art, likely since they are juicy, and the tomato skin protects the bread from getting soggy..and roasted tomatoes taste amazing and add a juicy sweetness to this decorated focaccia. Red onion rings also do well roasted, garlic cloves, mushroom slices, asparagus, olives are other great ideas to add to your focaccia art. Basil discolour ms when baked so go with other toppings unless you are making an Ocean and seaweed focaccia with dill and basil and asparagus. You can also go with a flavour profile theme like olive focaccia bread using various olives or just one kind of olive or a roasted tomato focaccia bread or a roasted garlic focaccia for a super garlicky bread.)
The dough should be at least doubled and done rising. When you think it’s ready, lightly flour your finger and do a finger poke test to see if the bread has risen enough. it should leave an indent that is slow to refill. If it refills fast, it needs more time as it has more rising to do.
create deep dimples in the dough with your fingers as if you are typing on a keyboard. This creates tension that smoothes out the rest of the bread. Then drizzle with generous olive oil to fill the dimples. (I foolishly didn’t make my dimples deep enough here due to the artwork since I didn’t know how it would look with my art, but I regretted it as they would have actually made it pretty with smooth texture and you really want dimples for the olive oil to collect in to make the texture distinctive of focaccia bread.)
top with flaky sea salt, herbs and veggie art. drizzle with extra olive oil so the veggies and herbs don’t burn. If not using veggies, top with extra rosemary and herbs to give it flavour and color.
If making focaccia art unlike baking plain regular focaccia, due to the veggies and herbs, you cannot simply bake it the whole time in the middle rack at 425 degrees for about 25 min as the veg would burn. for focaccia art: preheat to 400 degrees and bake on the middle rack for 15-20 minutes. then place on the lower rack, flipped over so the other side goes deep in the oven for even browning and bake for about 12-15 minutes or until lightly golden. Watch for it, but don’t open the oven too often.
take out of the oven. if you topped the focaccia with art let it cool a bit before carefully prying it out of the bakeware and placing on a large wooden cutting board, oohing and ahhing, then slicing with a bread knife.
serve fresh, or keep it in a plastic Ziploc bag for 1-2 days or freeze the focaccia for later. You can also store it in this bread bin that is the perfect shape for storing flatbreads and cakes- it is technically a steel cake pan with a lid, but it is from stainless steel so if you do bake in it note that baking will take longer as steel is not a good heat conductor like aluminum, though it is good for those avoiding aluminum.
variations: if you can tolerate dairy add parmesan add parm for parmesan focaccia or chees for cheesy goodness (make them on a large cake pan to be crispy and dunk these focaccia pizza bread sticks in marinara), and/or make a focaccia flatbread pizza adding pepperoni, or after baking the focaccia make it a pannini like burger and add your favourite deli meats, and/or add a spread such as my basil pesto. Or top with sundried tomato pesto (note storebought sundried tomato pesto often has parmesan, so make your own if you need it dairy-free), or antipasto or olive tapenade or hae with a side of olives.
Tip: use fresh homegrown herbs and you will always have lots of herbs for focaccia and other bread recipes, so you can use more regularly and pay a fraction of the cost, plus they are healthier and safer in pandemic quarantine cooking days, no grocery shop needed! Check out my Balcony garden section in the menu for tips! You can also grow salad greens like lettuce, spinach and chard on your balcony to have a safe, homegrown salad to pair with the focaccia bread.

What to eat with focaccia? Focaccia bread pairs with vegetable soup such as tomato soup or a salad or Italian food such as pasta or pair your garden focaccia with grilled meat at a grill or bbq, etc. You may have extra bell peppers and tomatoes and onions leftover, don’t worry I do too so I will be putting out a matching recipe on how to use those up soon, stay tuned and follow the blog! In the meantime a nice Greek salad will use up those veggies and pair nicely with this panini like focaccia bread.
Enjoy your focaccia bread any way you like. Bon appetit!
Tip: You may have seen this Decorated focaccia / Van Gogh dough/ focaccia artwork as a new viral trend on social media like Instagram and Pinterest. And any fresh warm homemade focaccia straight out of the oven is going to be the best focaccia! If you plan to take pictures using daylight, do the first rise overnight and the second in the morning so you are not rushed!
Post quarantine lockdown days: this is a great party food, or share food to bring to a picnic or BBQ, and a pretty diy giftable food (or is it an edible gift?) or a fun food arts and crafts to make with the kiddos or to share at a potluck. But for now it is perfect comfort food to bake alone or for your family in quarantine lockdown bread baking days!
Did you make this recipe or find this post helpful? Leaving a review helps our community! 🙂
Never miss a post! Follow this blog or my facebook page Pinch of Wholesome (formerly Dairy Free Indulgence) to stay posted on more delicious recipes! The follow buttons on mobile/cell are almost at the bottom of the page, and on the PC they are on the sidebar.
I will never spam you. It is your follows, shares, views and likes that encourage and allow me to continue this blog and keep sharing these dairy-free healthy recipes with you!
If you like this recipe and share it, tag me on instagram @pinchofwholesome #pinchofwholesome, I’d love to see your versions of my recipe 🙂


